Thursday, 21 May 2015

Wedding Dress Progress Part II: Pleating Chiffon and Sewing the Chiffon Skirt

Are you already wondering if I make any progress on my wedding dress?! I've started too and it helps that I have forbidden myself to sew anything else until it is finished. I still have 3 month time, but can feel a bit of pressure already.

Excuse my untidy sewing room and focus on the pinned dress please!
At least the dress is now my mean concern as we have sorted out the restaurant, photographer, bouquet, hair and make-up. It will be a beautiful day and I will be hopefully wearing my dream dress.

Progress so far:

I've sewn the chiffon skirt with mini french seams. Before cutting the chiffon, I sprayed it with starch and ironed it dry. It worked beautifully and made the chiffon crisp. So I had no problems sewing the tiny french seams. Because of the starch the dress has no drape at the moment. I hope it will wash out easily.


(I would recommend you remove the starch spray bottle from the bathroom after you are done, otherwise you might confuse it with hair spray in the morning. But I can attest that starch gives your hair a really good hold - for the whole day.)


I've pleated the center front piece. It took me four tries. The problem was that although the pleats looked ok, the center piece didn't had the right size suggesting that my pleats weren't even. So I tried different methods to mark the pleats:  I tried twice to use tailor tucks to mark the pleats and then I tried with a fabric pen and ruler to draw lines.

a mess of tailor tucks - didn't help.

Both methods should have guarantied accuracy, but still the piece was too small. Chiffon is not the best material to be pleated because it is still slippery even after starch treatment. To stabilise it I fused the thinnest fusible interfacing I had to the chiffon before cutting out and it is now really nice and even.

Left: chiffon stabilised with fusible interfacing. Right: not stabilised. Can you see the size difference?

I've gelatin bathed the silk, gasp, to make it less slippery (I was not sure if I could use starch and other bloggers made good experiences with the gelatin. I can only recommend that you fold your fabric before bathing it because otherwise you have a crumbly mess that you can't entangle when wet because the silk might tear. After drying the silk felt stiff like a board and was a mess of folds. I've managed to iron most of them out and the silk is still in one piece. Now the bad news: I'm not having enough to cut the back panel with the train. That's because initially I didn't want a train and thus bought less. But I'm pretty confident that I will be able to get more in Goldhawk Road (that's where I bought it). Now the question: should I cut into the silk now or wait until I have more?

Silk on the ironing board: Left ironed and right, obviously, not.

Together with a very motivating friend (wink Charlie) I pinned the parts of the dress on my dress form. It looks really nice, especially with the lace mesh flowers and ribbon. I'm thinking about sewing a lace cardigan with the lace you can see.


I've bought horsehair braid, boning and bra cups. Everything will go in the tiny bodice to stabilise it. I'm really scared of sewing these in. Especially because I've never sewn with any of these before. But with the long bank holiday ahead I will hopefully be able to tackle them!

PS: I'm sorry for the bad picture quality, but work in progress means mobile phone photos!

Sunday, 17 May 2015

Smart Casual or Girly? A Polka Dot Coco!


Here it is finally. My latest Coco in a Polka Dot Fabric. It is not perfect, but I love it.


Pattern: Tilly and the Button Coco Dress. This is already my second version of this pattern and this time I made the dress with a fold-under neckline and three-quarter length sleeves.

I've added again two long darts to take out all this extra fabric that would otherwise be pooling in my swayback.   

Fabric: Ponte Jersey Knit that I bought in Goldhawk Road, London. It is slightly textured and unluckily has not much stretch. Do you always test die stretch of your knit before cutting out? I keep forgetting. Because this jersey has hardly any stretch it would have been better to use it as a woven.


Fitting: I didn’t do any additional fitting this time (for fitting details of my first version please have a look here).  However, because the fabric is not very stretchy one fitting issue has arisen (or is more pronounced than in my previous version). The shoulder/armhole seam does not hit my shoulder. It causes the drag lines in the sleeves. So for my next version I have to do a broad shoulder adjustment by adding to the front and back shoulder/armhole. Otherwise I would say the fit is spot on :)

Dr. Daniela :)

I love the silhouette of the dress that is so pronounced with this rather stiff fabric. The black polka dots on white background make the dress look very classy. So classy that I decided to wear it for my graduation ceremony which took place in the Royal Albert Hall in central London. Thanks to the polka dots my family which was sitting on the upper stalls had me in good view all times.


I've spent some time the last couple of weeks, trying to figure out what kind of cardigans I should wear with my dresses. I have a lot of cropped and knitted ones that don’t go with such an A-line dress. I didn’t want to wear a black cardigan with this dress, as blacks makes me look really pale. But I think this long rose cardigan paired with a bow belt and rose shoes makes the dress look really girly. Which is the style I like :)


Good news: I'm currently spending more time on my wedding dress (I've forbidden myself to sew anything else!). I've taken a couple of pictures of my progress - which is rather slow. There are so many decisions to make and I tend to procrastinate a bit. But I'm back on track and will give you an update in my next post!

Thursday, 23 April 2015

Let's fly away Mimi Blouse

Little preamble: 
Me: Shall we go for a walk? We still haven't explored the surrounding area.
He: Yes sure. I will take my camera in case we see some birds, deer...
Out and about.
Me: Can you take a picture of me?
He: Yes sure.
Me: Wait. I have to take off my coat.
He: What??? I can't belive it. Are you taking every opportunity to get photographs for your blog?
Me (broadly smiling): YES!
Does this sound familiar to you?
 

It looks like I'm working my way through Tilly's sewing patterns. Because next on is the Mimi Blouse from Tilly's book "Love at first stitch". But what can I say, I just love Tilly's style (just to warn you, I'm also having the Francoise pattern in my stash and I'm eyeballing the Arielle skirt).


I started to fit the Mimi Blouse last year, but couldn't get the fit on my shoulders right. You can see a photo of the muslin on Claires Blog where I wrote a guest post about Muslins. (It's the "fitting a blouse" photograph near to the end of the post.) I gave up on fitting the blouse. But the thought that I gave up (and got defeated by a piece of clothing) kept nagging on me. Thus I started anew and succeeded :)


Alterations: The biggest change I made was to add 1 1/4" to the yoke at the shoulder to adjust for my square shoulders. Before, the neckline didn't lie flat, but now it is! Adding so much fabric to the shoulders meant that my neckline changed a lot and thus I had to draft a new collar and facing. I also did my usual 5/8 forward shoulder adjustment.

I had the feeling that the sleeve hem looked a bit tight on some photos of the Mimi blouse. Thus I added 3/8" to each sleeve hem tapering to nothing towards the armhole. I also raised the sleeve cap by 3/8" and moved the shoulder point forward 5/8". That's it. These are not a lot of changes for me and I managed to sort them all out in one afternoon.  


Construction: I followed Tilly's instruction, which were brilliant as always. Tilly suggests to sew the side seams first and then to attach the collar. I think for my next version I would prefer to set in the collar flat first and then sew the side seams.


Fabric: It is because of this fabric that I decided to revisit Mimi. It is super soft and drapey and I knew immediately that it is perfect for the blouse. I think it is some viscose polyester. I bought it from a market stall in my new home town for £2.99/m. Guess what convinced me to buy it? The birds, haha. It looked awful on the bolt, so many creases. Ironing helped :) However, it was off-grain. A lot as you can see on the photo below. But that didn't stop me to cut the blouse.

Off grain fabric.

Do I like it? I love the blouse, it looks so playful and feels so nice on the skin. I was planning to wear it with my Delphine skirt (version 1 and 2) like Tilly does in her book. But unfortunately due to my sway back, there is a massive fabric balloon on my back. It just doesn't look pretty, sniff. But I had a rummage through my pattern stash and found the Mabel Skirt pattern from Colette patterns. I'm planning for ages to make that skirt. The time has come :) Mabel is a tight fitting jersey skirt and I think will look lovely with Tilly's blouse - if the blouse is not tucked in - that's how I plan to wear it.

The first button is gold-blue because I didn't have enough of the blue ones.

Will I make it again? Ahem, at the time of typing version two is already made up and version three has been cut out. I'm in love :) I hope you are getting not bored, but I try to not show them to you one after the other! Have you ever been so enamored with a pattern that you HAD to make it at least twice - without sewing something else in between???


Thursday, 16 April 2015

Better late than never: I made a purple Coco!

I have to admit that at first I wasn't convinced that Coco would be my style, but having seen so many pretty versions I started to yearn after the pattern. So, I went to the backstitch shop one rainy afternoon and got it (along with the Francoise dress by Tilly and the Dahlia dress by Colette, ahem.)

I only realised after taking these photos that the fabric is a bit clingy.
So excuse the folds.
Pattern: Coco Dress by Tilly and the Buttons. It is a jersey fabric pattern and contains instructions for a dress and jumper. I made the dress with long sleeves, turned under hems and funnel neck as the fabric still screams winter.

Size: I cut a size 2 for the bust and a size 3 for the waist.

You might be able to see the backdarts I added.
Fabric: I used some plum colored jersey that was living in my stash since last year. It was one of the few solid colored fabrics I have and I wasn't at all sure about it. I tried desperately to sneak in some patterned fabric for the pockets, but Lescha kept insisting that both styles didn't go with each other, meh.


Alterations: On the tissue I made my standard pattern alteration which is a 5/8" forward shoulder adjustment. You might have spotted already the biggest alteration I made: I added two back darts. These darts have a diamond shape and thus take out a lot of extra fabric in the area of my sway back. I didn't intend to do this alteration, but when I tried on the finished dress, I just didn't like the fit of the back on me.

You can actually "see" how much fabric I removed with the darts.
Just imagine a straight line going from my back to bum. 
One of the big problems I have with similar style RTW clothes is that the fabric clings to my bum and then there is the excess of fabric just above my bum because of my sway back. Not a pretty sight. I didn't mind, but after starting to sew and caring about the fit, I just can't ignore it anymore.

Construction: With the help of Tillys instructions a joyous ride! I just love her photo instructions and how clear everything is. The whole dress was sewn on my overlocker and I used a simple zigzag stitch for the sleeves and hem. (I'm not happy with the twin needle on my Brother machine sewing machine, so avoid it as much as I can.)


Do I like it? I love the dress especially when wearing it with my mustard colored tights! I wouldn't have thought I would enjoy wearing a solid color so much. Maybe I should buy more?! Fit-wise I think there is still some room for improvements. The sleeves have some drag lines. I've had this problem before and usually the addition of height to the sleeve cap helps.

Can you wear a slip under a jersey dress? After seeing these pictures
I really wonder if I should!
Will I make it again? I definitively will! Indeed I have made another version already! I just say polka dots! Hopefully it will make an appearance on the blog soon (fingers crossed for some sun!).

So tell me: Have you made the Coco Dress or Jumper? Do you find them as comfy as I do?

Me making silly poses. The sun was out - it made me so happy!

Thursday, 9 April 2015

Here come the Racoons!

So here it is, another Megan Dress :) I love it! 


Fabric: Cotton with adorable racoons. I bought the fabric at backstitch.co.uk last year as a treat after driving the first time without the driving instructor. It was £14/meter - more expensive than the fabrics I usually buy. But how could I resist?


Pattern: Megan Dress by Tilly and the Buttons featured in Tillys book Love at First Stitch.

Fitting: Having made the Megan Dress once, solving the residual fitting issues should have been easy. However, taking into account that I hadn't done any pattern alterations for several month, it took longer than thought. I had to retrace the bodice because I messed up completely. See that's the reason I'm tracing all my patterns!


I made the following changes:

1. added 2 1/2" to the length of back and front skirt
2. broad back adjustment of 1/2" because in my first version I can hardly move the arms forward
3. deepened the back skirt darts which have now a diamond shape
4. shaved off the curves for the hips on both back and front skirt
5. lengthened the front and back bodice by 1/2"
6. moved the bust dart down by 1/2"

The neckline still gapes a little, so I have to take it in a bit at the shoulder seams for my next version :)


Construction: It took my about one weekend including cutting. I didn't want to hurry, but enjoy the actual sewing process.

I tried to pattern match the seams, but failed. Luckily the front looks fine with a row of racoons going down the center and also the matching at the waist line is not bad. But the back or side seams are not matched. I blame that on the fact that I cut the fabric double layered. Obviously the bottom layer was not straight :(


Have I worn it? Yes I have worn it to work and I can attest that it feels super comfy. No more strain on the back bodice when stretching out my arms. I can sit down without exposing too much leg. I even got compliments at work from my colleagues which made me happy :)


Will I make it again? Yes! I'm hoping that Megan will become a TNT pattern for me. So far none of the dresses I've made qualify as a TNT. So fingers crossed.

The fabric is bunching over my bust. But that will be gone after I take it in
(on my next version) at the neck shoulder seams.

Saturday, 4 April 2015

Wedding Dress Progress I: Muslin and Fabric

In the absence of good weather to take pictures of new makes outside, I thought it will be nice to update you on my progress on my wedding dress.

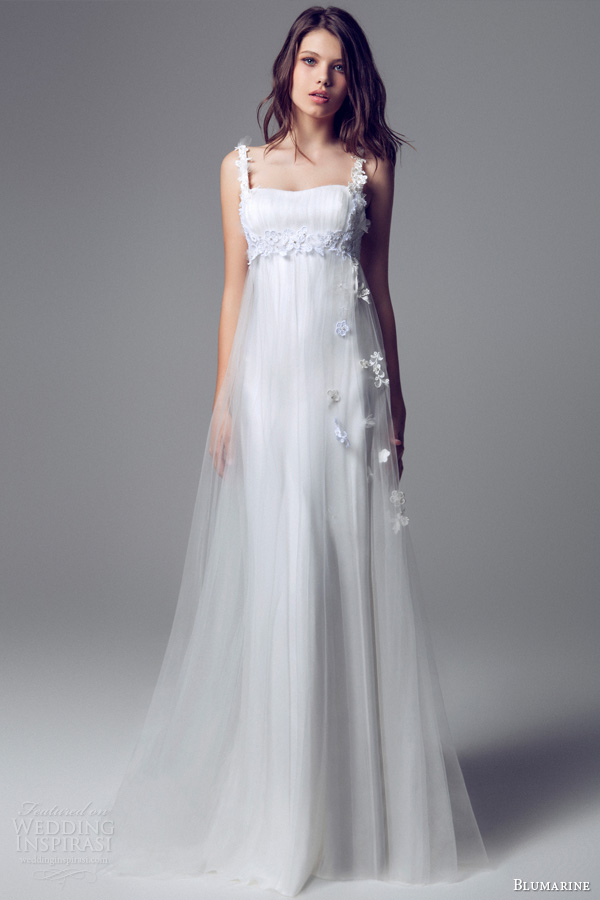
Inspiration dress (source)

I've chosen Butterick (B5325) which looks similar to my inspiration dress. It comes without straps so I will just add them. I've traced the pattern and graded it up several sizes for my waist and hip measurements. The only problem was that the biggest pattern size was 12 and according to the chart I needed size 16 at the hip. Thus I measured the distance between size 12 and 10 on the pattern and added it twice to the hip area. I then graded down to size 14 at the waist and size 8 at the bust.

I had to step on a stool, otherwise the fabric is just bunching up.

A quick tissue fitting of the bodice showed me that it fit well and I went ahead to make a muslin. I used a cotton (a former bed sheet) for the bodice as it has to be structured. For the skirt I used some old curtain - a very thin polyester with some drape.

I really like the fit at the waist. You can see that I pinned out some fabric at the side seams.
Surprisingly, the bodice fits me well. I expected to change the position of the apex but didn't need to! You can't imagine how happy this made me :) I just need to take out some fabric at the top of the bodice because otherwise my neckline is gaping. I might also add some horsehair braid to the neckline to stabilize and shape it. I've got the idea from a great tutorial by Gertie.

Bodice dropping towards the side seams.

The bodice is dropping towards the side seams. I think this is because the skirt is heavy and pulling it down. I'm not sure if this will improve if I add boning to the real dress. However, the addition of straps helps a bit in keeping the back more straight.

I couldn't decide where to attach the straps. I moved them further outside in the end (see below).


The skirt also seems to fit fine. I haven't decided yet if I want to keep the train or not. I really like the look and feel of it and when wearing the muslin kept walking in front of the mirror just to see the train. It makes such a nice noise when dragged on the floor :) However, because we are going to have a small wedding with only our parents and sisters, I don't feel the need to have one. Ah, I just can't decide!

Ignore the bunching at my hips - I'm holding the dress up in the front to avoid
stepping on it.

I've bought already the fabric. I got a lavender chiffon for the shell fabric and some sand washed silk for lining. The chiffon bodice will be underlined with silk dupion. It was the first time that I bought silk (and such expensive fabric). I have also bought a craftsy class about sewing with silk. So before touching the silk I'm going to watch that class. Do you have any tips about sewing with silk?

From right to left: silk dupion, chiffon, sand washed silk. The colors are darker than in reality.

So what's the next step? I have to make the changes to the pattern and order some horsehair braid. I also don't have any lace flowers yet, so if you have any suggestions where to find some please share!

Happy Easter to everyone!

Thursday, 26 March 2015

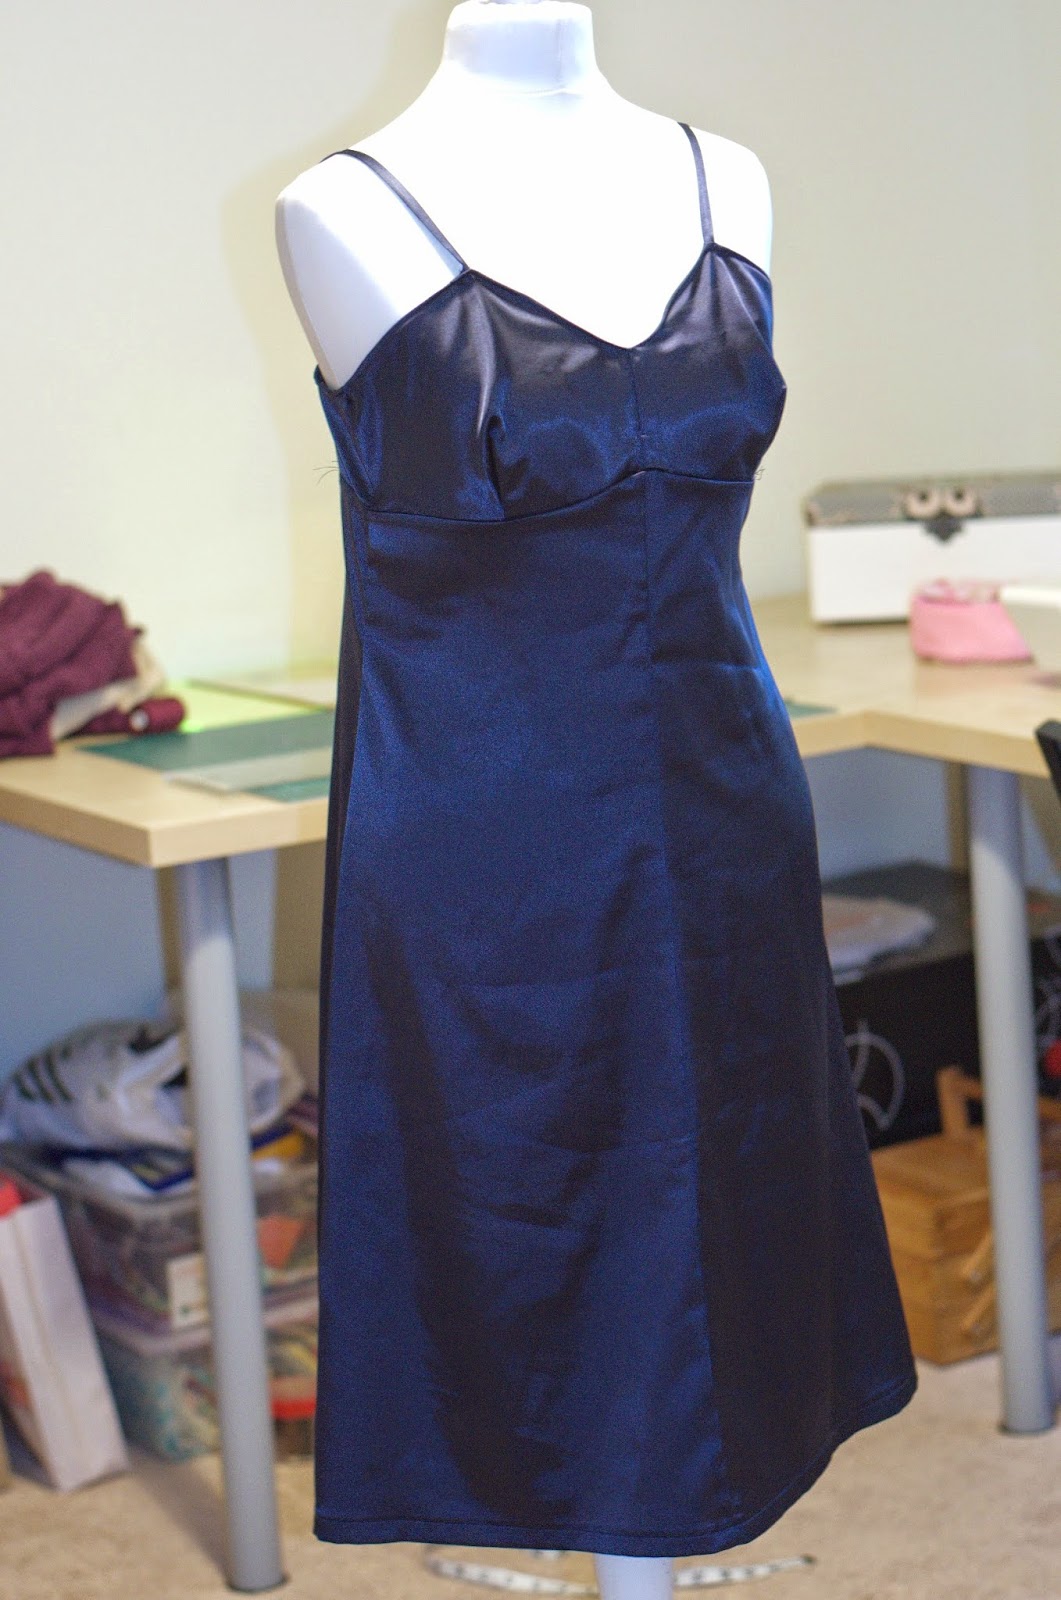
A full slip to wear under cotton dresses - a necessity!

The big problem of cotton dresses (at least in my opinion) is that they stick to your undergarments. They stick to vests, shorts, not to mention leggings. It does not look nice when your dress is clinging to you and it restricts your movements.

To solve this problem, I would usually fully line a dress. It takes a lot of time because you have to make to dress essentially twice. I decided it was time to sew a full slip. I had planned to make the Ruby Slip pattern, which is pinned to my pinterest board since last year, but sadly couldn't access the website anymore. I found another free slip pattern, but there was a problem: it didn't have any online instructions (by now I remembered that there is a slip pattern plus instructions in my GBSB book series 2 - next time!).


Pattern: Vintage slip pattern from House of Jo (in association with the Sew Magazine). It's free!

Fabric: I bought some 2-way stretch shinny fabric on a market stall. It was only £2.99/meter. It is blue, feels soft to the skin, frayed like crazy and I guess is polyester.

Construction: When I made the slip I couldn't find sewing instructions, but I've just seen that they are on Jo's website in the comment section. I decided to use french seams to have a neat finish and hide the fraying seams. Surprisingly this went very well.


However, I had problems finishing the neckline. In hindsight and as suggested by Jo, I should have finished the neckline with a binding or some lace. But I decided to attach the straps to it and then fold the raw edge of the neckline under twice. Which didn't work well. The neckline stretched out slightly and because of folding them twice, the straps are now too short.

It means the bust does not sit on the bust but above. It makes the dress too tight over the bust. I'm thinking about cutting the straps off the back and making a new piece of strap that I'm attaching to the old one and then to the back. If you have any other suggestions, please let me know.


You might notice that the bra cups look pointy. That is because the pattern tells you just to sew a triangle dart. I'm not sure if this is the style of vintage patterns? It does not show under the dress, so I'm inclined to leave it like that.

Have I worn it? Despite it's fault I have worn the slip underneath some cotton dresses and it fulfills its function. It prevents the clinging of the cotton to my undergarments, yeah!

Will I make it again? I would like to make it again, now that I know how to finish the neckline. The only problem, there are too many other garments that tempt me and not to mention my wedding dress.


Related posts

related posts plugin for wordpress, blogger...