Thursday, 29 August 2013

Colette Pastille - difficult birth but (almost) done

Finally, I am (almost) done with the Pastille Dress from the Colette Sewing Handbook. In total it took me 2 weeks starting with pattern tracing, muslin 1 and 2, and the final version. At times I actually was not sure if I would finish this dress and just kept going for the sake of it.

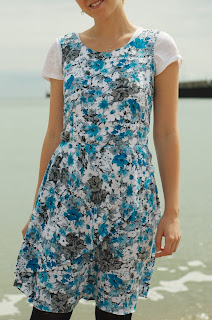
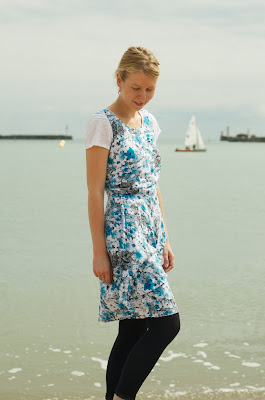
May I introduce my Pastille Dress:

Summer time...

Pattern: Colette Pastille. The original pattern comes without the waistband. There are 3 pleats on the hem and the dress has little cap sleeves. Closure is a centered back zipper.

Constructions: I almost gave up at several points, because I got stuck and didn't know what to do. My main issue, which was completely self-made, was that the side seams of bodice/waistband and skirt don't match.

Seams of waist and skirt don't match.
Fortunately it is not that obvious (when you not sew yourself). I couldn't figure out what the problem is. But luckily, Charlie from thisblogisnotforyou pointed out after my last post, that I had reduced the center seam (muslin No2) of the bodice. Apparently, I must have applied these changes to the waistband but not to the skirt. That explains perfectly well why my bodice seams are closer to the center. (I still think, I pattern walked on the tissue to make sure the patterns have the same length.)

My waistband came out weirdly shaped - ah, it's a design feature :)

Also the shape of the waistband is a bit odd. So, all the way, I was asking myself: Why did you have to make a waistband? Wouldn't a simple belt be enough? And because of the waistband I had short fat darts, which were very difficult to press. I tried to re-sew several times to make the point a bit sharper, but then they were too long.

Neckline with a satin ribbon.

The neckline was also really scary, as it got its right shape only after I had stitched the facing on. Before there were millions of drag lines (there are still a few).


Mr Zipper and I were also no friends. The pattern called for a centred zipper and as it was 3 years ago, that I had sewn one, I gave it another go. I had my sewing book next to me, but somehow the descriptions were not very detailed and I ended up with an ugly very visible zipper. I know it is not an invisible zipper, but still. After having a chat with Charlie, we decided that I could try to push some fabric over the zipper with the iron. I then tacked the fabric by hand, so that the zipper was hidden underneath. Then I stitched around the zipper to secure the fabric. Not perfect, but at least it is not screaming anymore at you when looking at my back. Too late (now) I realised, I actually have a free Craftsy Class for mastering zipper techniques, ah.

Being done with the zipper, I discovered that there were massive fabric folds on the skirt back radiating from the waist to my bum. These were there because of my sway back! I had made a sway back adjustment to the bodice but not to the skirt :( I managed to make them less visible by making the darts on the skirt a bit bigger. Now, I had the problem I couldn't step into my dress anymore, but luckily I was reminded that I can pull the dress over my head as well :) Should have been obvious, shouldn't it?
Details...
Also very depressing was, that my boyfriend told me that my waist and main fabric do not fit together and that polka dots don't suit that style of dress, bummer. He made that comment after I failed to sew in the zipper. So very motivating when you are down already, grrrr.
 
Will I make it again? I don't think so. At least not with the waistband. At the moment I am just fed up with this dress.

Have I worn it yet? No, because I still have to line the skirt - that's why the heading says almost :) I have underlined the bodice and wanted to make a lining for the skirt. I really have to, because the skirt was clinging to me like crazy when we went out to take the pics. So, I hope I get my spirits up soon to do it.


Do I like it? I think I start to. I love the fabrics and the little pink bow. The style and colours are so me. And if I wear it with a cardigan, you will not see the zipper :)

Sunday, 25 August 2013

WIP: Colette Pastille

I am now further making/sewing my way through the Colette Sewing Book. So far, I have made two Meringue Skirts and one Truffle Dress. So, next on my list was the Colette Pastille. I had bought the fabric ages ago and was ready to start.

Colette Pastille
My original plan was to make the dress without any alterations and to sew a little bow belt to go with it. But somehow, I got that idea stuck in my mind that I could make a contrast waistband instead of a belt. I found a really good tutorial at Purls and Pleats.

As the dress is in the "Fitting" section of the book, I wanted to make sure I get a proper fit by making a muslin first. Before making my first muslin however, I made my usual Colette pattern changes like SBA and sway back adjustment. Then I made my first muslin and you can see the not at all flattering fit here:

Are we playing football? Nope.
There is still too much space on my bust, the waistline is not on my natural waist and, lets say it, I look like an American football player and that even after I have changed on this pic the shoulder already. Also, for some reason, the front bodice rides up over my belly. I transferred my alterations to the pattern.

Too much fabric and the front bodice is riding up.

And then, in a very unconventional (very wrong) way, removed some tissue from the bodice front and back at the seams to get an even line from back to front. I then made up for the shortened seams by adding 1" to get the proper height for my waistline. Then it was time to try out the waistband. Following the tutorial, I made a waistband for the front and back bodice. In theory it is quite easy, you just cut off the desired waistband length and close the darts. Then you add seam allowances to the bodice and waistband, voila!


The 2nd muslin is still too big (here I pinned the excess out) and riding up.

I cut out my 2nd muslin and tried to sew on my waistband. Here I met challenge No 1, but managed to pass with loads of swearing and trying and pushing. It fits :) This time, I even stitched a zipper at the back. I had to, because my boyfriend who usually pins my back was not around and I somehow had to close it. This time, the fit looks much better (ignore the awful darts, it is only a muslin) at least when looking from the back and front. There are still a few fitting issues:  (1) too much fabric between my apexes ;) I pinned that extra fabric out and altered the pattern. (2) my front bodice is still riding up. Theoretically, I would have to slash the muslin above my bust and drop the fabric until I get an even waistline. BUT, I chose to ignore that. I know, I know, silly me. But whenever I slash and drop the bust, it does not fit on my waistline anymore and creates more problems. Next time, I promise, I will do it properly.

Cotton poplin from Goldhawk Road and Canterbury. The flowers will be the waistband.
Next I have to cut the fabric, which is a super nice baby blue polka dot, and the lining. I will make an underlining, which at the moment is the easiest method for me. So, hopefully, in my next post I can show you my finished Pastille Dress!

What are you having on your sewing table at the moment? Are you having any awful fitting issues?

Monday, 19 August 2013

Ela sews and KNITS?

Are you knitting? I think I will start again!

Having been to the bloggers meet-up on Goldhawk Road in August I saw Rachel's beautiful Miette Cardigan (My Messings: Miette - Finished!!) which she had knitted herself. I just fell in love with it and my imagination went crazy. Just how lovely would it be to wear a self-knitted cardigan over a dress I made? That thought hasn't left my brain and got me thinking.

I am not foreign to knitting and learnt it from my grandma when I was a teenager. I knitted several scarfs and even a vest and a jumper. The later ones, unfortunately, didn't fit me as I struggled to keep my tension even. That was six years ago. Knitting is like cycling, right? You will never forget it, once you learnt it. So I had a look into my sewing box and look what I found.

Loads of knitting needles and even a needle gauge.

I also had a look into may favourite knitting book. I got it from my granddad 18 years ago and it tells you all the basics about knitting, crocheting and stitching (needless, to say that I tried all three of them :) ). Sorry, it is in German. But, because I love it so much (especially all the little hand drawings), I wanted to show you a few pictures. Maybe you will recognise a few of the stitches :)

Knit, Crochet, Stitch...
Purl (here shown for left-handed people).

How to cast off.
So, now the question was, what could I knit to get slowly started again? I had an issue of Mollie Makes, which contained the pattern for a lovely lace scarf!

My knitting aim: a lace scarf :)
Not, that I had ever knitted something in rounds and not that I am very good in reading knitting patterns and not that I knew the English names of the different stitches. But, my enthusiasm couldn't be damped and off I went to the knitting shop. The owner, an elderly gentleman, was very happy to help me and wished me a lot of luck after I told him I hadn't knitted  for ages. I am sure I need that :) So here is what I got:

Wool, stitch markers and needles.

There were so many lovely colours and I couldn't decide! But at the end I took the pinkish ones and to everybodys amusement I was wearing a scarf in the same colours :) Then I had a go on a 10 cm tension sample. I feel a bit embarrassed to show it to you because it looks nuts. But never mind, I am sure I will get better! I had problems to read the stitch pattern the other way around when I made my way back. And also for the yarn over, it took me a while to understand how to do it. Thankfully at you tube there are many videos that show how to do it :)

Are you sure you have knitted before?

So, are you knitting? If YES, what are you working on and when NOT have you thought about starting?

Have a lovely Monday everyone!!!

Wednesday, 14 August 2013

What was the first item you ever sewed?

The other day, I was thinking about my blog and about how I started to sew. I then remembered the first item I ever sewed and was wondering if you, my lovely followers, can still remember the first item you ever sewed? I would love to hear/read about it and will make the start by telling you about what I sewed.

The little cube on the right site of this picture was my first sewn item :)
 It still exists and is well-loved.
The first item I sewed was a little cuddle house for my guinea pigs :) Surprised? Yes you can make cuddle homes not only for dogs and cats but also for little rodents. I had bought already a little hammock and tunnel from the Internet. When looking at them, I thought it can't be that difficult to make by myself. So, I started to ask my grandma if she would teach me how to use a sewing machine and how to sew.

Vesna in his cuddle cube.
That was 4 years ago. I still remember sitting there with my grandma winding the bobbins by hand. I found a tutorial about how to make a cuddle house on the Internet and bought fabric and quilting wadding. My grandma was a bit surprised (or should I say shocked) about what I wanted to sew, but helped me none-the less.

Queeny in her cuddle bed counting sheep to fall asleep.
I think we were both surprised at the end result - a lovely cuddle house for my piggies. My success resulted in making even more cuddle homes, pyramids, shoes, hammocks and bags. I even made my own patterns after having a look on ready made ones on the Internet. So, yes that is the first item that I ever made and that got me into sewing! What is yours?

Happy munching.

Sunday, 11 August 2013

Let's make a Flowery Colette Truffle Dress

I am still making my way through the Colette sewing book. So far I have only sewn the Meringue Skirt (not blogged, but you will find pictures here) and that twice because I love the scallops so much. Next in line would have been the Colette Pastille, but having been at the bloggers meet-up in Goldhawk Road a week ago I got some lovely flowery fabric in a swap. When I took the fabric, I actually didn't know what to sew with it. I just loved the colors and the drape. At home when looking through the Colette sewing book, I knew immediately it would be perfect for the Truffle. Luckily, I had just enough fabric (pattern instructions said you need 2.5 m - I had 1.5). Believe me there was hard pushing and rearranging involved – but I succeeded, yeah.

On the sea side :)
Truffle with a white shirt underneath.
Pattern: Colette Truffle Dress. The dress is sewn together at the waist and has a lined bodice. Bodice shell and lining fabric are sewn right side together at the neckline and armholes and then the right sides are turned out by pushing the whole dress (!) through the shoulder. Then you stitch the hem of the lining to the waist seam of the shell fabric, which helps to stabilize the waist seam – so hopefully no stretching here. The dress has an invisible zipper at the back. Special feature of the dress is that it has an extra bit of draped fabric hanging from the waist to the hem. 

You can just make out the drape.
Watching boats :)
Fabric used: Polyester/Cotton mix? I do not know the fiber content of the fabric, but I am sure it does not contain only cotton because when I cut it, it was sliding around and I also had problems to lay it out straight. So, the fabric was a challenge for me and I definitely learned a lot trying to handle it. As the pattern calls for a lining, I used some cotton/silk that I had in my stash.

Pattern alterations: This was the first time that I didn't make a muslin and just fitted the tissue using the Palmer/Pletsch approach. I have already worked out most of the problems I have with Colette patterns, so that it is a bit easier to fit them.
  • Moved shoulder seams forward about 3/8” (sloping shoulder adjustment) 
  •  Moved the bust dart down 1” and made a small bust adjustment (I have an A cup only and Colette patterns are C cups)
  • Graded the side seams from size 0 (bust) up to size 4 (waist)
  • Lengthened the pattern 1” as it was not sitting on my natural waist
  • Sway back adjustment

Am I happy with the fit? Not entirely, because there are three issues: (1) I am never sure where the armholes have to stop and I think I fitted them too far out. When I wear the dress the armholes slide towards my neck and because of that there is too much fabric on my back, which results in a gaping neckline. (2) When cutting out the fabric, the bodice front which is cut on the fold was apparently not on the grain and now there is a big ugly crease going from my bust to the waist line. I also had the feeling that the fabric was stretching a bit because when attaching the skirt to the bodice I had to ease the skirt in. It almost felt as if I am setting in a sleeve, buh. When looking at the photos now, I have to admit you can hardly see the crease. But I know it is there :( (3) Because of the stretch of the fabric the shell is bigger than the lining and looks a bit bulky. It would have been better to actually make an underlining for this dress because that would have stabilized the shell fabric better and also prevented it stretching. But if I would have chosen the underlining, then I wouldn't be able to follow the sewing instructions and I am not confident enough yet to do so!


What I like about the dress: I like that it fits quite well although I haven’t made a muslin. I love that the neckline looks so nice and tidy – I was worried when sewing it. It actually looks nice when I wear it with a white T-Shirt underneath. 

Will I sew it again? Maybe next year when I am more experienced with drapey fabrics and underlinings. 

Have I worn it? Yes I wore it on Saturday when we went on a bus tour to Dover, Leeds Castle and Canterbury. Surprisingly, I felt great in it and didn't mind at all the crease under my bust or at the back neckline. And imagine, I managed to tear a whole in my cotton/silk lining! I was trying to pull down the zipper myself and caught the fabric! Now there is an ugly whole of about 1 cm in the lining :( I can't really fix it because it is too close to the zipper and I don't want to add any bulk there.

Goodbye Dover!

Tuesday, 6 August 2013

Blogger meet-up at Goldhawk Road

On Saturday the 3rd of August I made my way to Goldhawk Road to meet up with almost 40 strangers from the Internet. Claire from sew-incidentally had organised a blogger meeting including fabric shopping and lunch and let me tell you it was absolutely stunning. Hop over to Claire's blog to read her post about the meeting which has more details about lunch and about the organisation than mine has. She also has a list with all the participants and their blogs! So, go and check them out! Lovely Dibs from Dibs & the machine took a huge amount of photos on the day and kindly allowed me to put them on my blog (thanks a lot Dibs!).

Lovely little name tags!

As I have never been to a meet-up before, I was super nervous and also a little bit scarred (because normally I am not meeting up with strangers and there were so many of them!). When leaving the tube at Goldhawk Road Station I could hear them already and my excitement grew. How should I approach them? How do I introduce myself? But actually, there was no need to worry because I was welcomed immediately with cookies and a little name tag. Everybody was wearing their own creations and there were many uhs and ahs when looking at each other. Sooooo pretty. Although I didn't recognise the patterns (not yet, but hopefully soon) I was impressed by all the lovely dresses, trousers and blouses.

Claire.

After almost everybody had arrived we split up in little groups and "attacked" the fabric shops. First stop was "Classic Textiles" my favourite fabric shop where you can get cotton silk for 4£/meter and also Liberty copy prints and lots more. I avoided looking at the Liberty fabrics because I fall in this trap every time I am there. I was astonished by all the fabric knowledge everybody had. One touch, one view and yeah it is a Chambray. We moved from shop to shop and it was really fun because every shop you entered there would be somebody with the little yellow name tag. The advantage (or disadvantage?) when fabric shopping with several people is that everybody spots different fabrics. Fabrics that I liked as well and wouldn't have seen otherwise! So I was tempted several times to buy - but didn't! 

Dibs and Wendy.


In Fabric House I bought my first jersey ever which was 3.50£/meter. I was not sure if I should buy it or not because I have never sewn with jersey before and thought I need an overlocker to sew it - although several people told me you don't! So, Jamila convinced me to buy it for later when I am more confident. I just love the pink flamingos on the jersey. I am hoping to sew a dress from this, but have to find a pattern first. Any recommendations? I also found some cheap cottons in the scraps bin of A one fabrics.

Flamingo jersey and some cottons.
Then it was time for lunch and Claire had managed to grab us a table the whole cafe. Lunch was amazing and I had the possibility to chat with a few people, especially with Charlie from This Blog Is Not For You. Funnily enough we found out that we are originally from the same area, hihi. I would have never guessed that I would meet somebody who has been living so close to where I am from.


After lunch it was time for the epic fabric swap! Everybody had brought some fabric, notions and/or patterns that they wanted to swap. As my fabric stash isn’t that big yet I brought only a liberty copy print (leftover from my meringue skirt), a pattern and a few vintage-looking buttons. Everything was put on big tables forming a massive heap. Actually it reminded me of the days when the sales start in the big department stores. There would be heaps of clothes on the tables as well as lots of woman waiting to dive into it :) We were a bit more restrained and everybody got the chance to find a lovely fabric or pattern. There was no rule for how many items you are allowed to take. So at the end I ended up with quite a bit of fabric. I felt a bit greedy though (usually I am a modest person), but for me it was a possibility to pick up fabric that I wouldn’t usually buy because I am afraid of sewing with it yet (I just say stretch). 

Patterns!!!

Fabrics!!!
So here is what I got: A few lovely cottons which will also be perfect for patch working. Then some ice blue lining which I got from Emma from My Oh Sew Vintage Life (I just thought that would be perfect for the Victoria blazer) and some flower fabric with a bit of stretch donated by Kat from Krafty Kat. The last one has already made its way into a dress :)


I also got some lovely vintage patterns and a modern pattern, which I am going to try soon! I just love the dresses! After the swap we split in groups again and went for some more shopping. I left shortly after because my bag started to get really heavy!


So, if you ever have the chance to attend a meet-up just go! All the lovely people you meet will not be strangers any more at the end of the day! I honestly enjoyed meeting everybody. It was also my first opportunity to meet up with other sewing enthusiast and I had the feeling we were all talking the same language! I know a few of the patterns we talked about just from reading other peoples blogs and it was just amazing to have an idea what was going on. So thank you ladies for such an amazing day!!!

Sunday, 4 August 2013

Ever tried to sew a men's vest?

I did! I am sure you are wondering "Why has she sewn a men's vest?" and  the reason is that I am living together with one of these male species and wanted to say thank you :) This male species is my boyfriend (as you might have guessed already) and he is always super supportive. He is the one who is pinning my back when fitting a muslin, he tries to cheer me up when I am stuck with fitting and he takes all these lovely pictures from me :) He actually was the one who convinced me to take up dress making again. Not totally unselfish, because he is hoping that at some point -rather sooner than later- I will sew him a fitted shirt. He even convinced me to buy the Craftsy class for a tailored shirt when it was on sale. But at the time being I am neither having the skills nor the intention to sew a shirt. Because men's shirts are kind of boring. You can't add any lace or funky buttons... But enough of that and let me introduce the first (and last?) men's vest I ever made:


Pattern used: Simplicity 2346 which is a "Learn to sew" pattern which teaches skills like lining a vest and adding a pocket. My boyfriend chose version B but without the patch pocket. The vest is fully lined and closes with 4 buttons. At the back you can adjust the fit with a waistband and D-rings.


Did I make any alterations? Oh yes! I bought the pattern when I took up sewing in March and thought it will be a nice little project. It shouldn't be difficult to fit the vest because you don't need any bust adjustments :) But, in the end it was not easy at all! It took me two muslins and I had to trace the back twice (luckily I am tracing!). The problem was, that I was not sure what the fitting issue was. Also the vest did not have any darts at the back so I did not know how to shape there. In the end I made a sway back adjustment and I also added tissue at the back at height of the shoulder blades to give more room for my boyfriends round back. The neckline and back armholes were both gaping so I had little choice than to add a dart at the shoulder seams. I also shortened the waist and moved the shoulder seams - both of these task were the easiest ones and the issue fast spotted.


new shoulder darts.

Fabric choices: The fabric is a men's suiting fabric that contains some wool fibers. We bought it in Goldhawk Road where I almost passed out when seeing the prices for suiting fabric - imagine me a beginner and sewing with a fabric that is 16 £/meter. But we were lucky, because after I pointed out, that I am a beginner I was referred to the leftover fabrics which were half the price but you had to buy the full piece. So, I found one that was not overly long and got that (I still have half of it left and no idea what to use it for). For the lining we bought some polyester and the buttons I bought in a little yarn shop that I have discovered in Ealing, London.


Fabric preparations: I have never worked with woolly fabrics, so I was worried how to preshrink it. I found some advice in Claire Shaeffer's Fabric Sewing Guide, who suggested to steam the fabric. So I just filled the bathtub with hot water and left the fabric hanging over the railing for half a day. Believe me it was not niece to go in there, especially because it is quite hot in London at the moment! I then left the fabric to dry and done. I didn't preshrink the polyester in the hope it will not shrink/ the vest will always be clean and there will be no reason to dry clean it :P.

Too tight buttons.
Garment construction: As the pattern is a "learn to sew pattern", it came easily together. You just sew the right sides of fabric and lining together, leaving an opening on both side seams. Then you turn it right side out and press. The pressing took me ages, as I was trying to get a crisp edge so that the lining doesn't show. Then I was afraid I would shrink the wool by accident even when using a pressing cloth.
The instructions tell you to sew the main fabric side seams together and then hand stitch the lining side seams (buh). Here, I must have misread the instructions, because I had sewn the lining together and then hand-stitched the wooly fabric. All the while wondering why you would do it this way around because my stitches are not that perfect and they might show. Just when I started to hand stitch the second side seam I had another look on the instructions and realized my mistake. Hello Mr. Seam ripper! Having corrected that, everything worked out :)

Shiny lining.
crappy hand stitching.
Has my boyfriend worn it yet? No for two reasons: 1st it is a Birthday present and his Birthday is in August and 2nd it is far too hot (not that I am complaining).

Will I make it again? Probably not. I am sure one vest is enough, don't you think? You can't do much variations there except for fabric and buttons. Also, I am quite selfish and prefer to sew garments for myself.

Related posts

related posts plugin for wordpress, blogger...